Note: If you use the Arduino IDE software, you must click Tools and select the corresponding Arduino development board. If you do not select the correct development board type, the compilation will not transfer successfully. Therefore, this is an issue that requires special attention. We provide technical support services, so if you have any questions, please feel free to contact us.
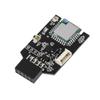
keyestudio leonardo R3 is fully compatible with the official version and has the same circuit arrangement as the official one.Before packaging, made from environmentally friendly production technology and materials, which has passed FCC and CE certification. Performs function, voltage and current tests.
This is a modern open source controller. Featuring cute yellow black design and 23 digital I/O ports, including 7 PWM ports and 12 analog input ports
Maximum allowable current for 5V digital/analog ports: 40mA, and 3.3V digital/analog ports: 50mA. Working voltage: 5V; Input voltage (recommended): 7-12V
[KEYESTUDIO Technical Support] If you have any problems during use, please feel free to contact us and we will promptly support you. There is a complete online graphic description of this product and a detailed English user manual can be found by searching for "KEYESTUDIO KS0248" in Google Chrome.
specification
Controller: ATmega32u4
Working frequency: 16MHz
Working voltage: 5V
Input voltage (recommended): 7-12V
Digital I/O ports: 23
PWM channels: 7
Analog input: 12
Maximum allowable current for 5V digital/analog ports: 40 mA
Maximum allowable current for 3.3V digital/analog ports: 50mA
Flash memory: 32 KB (ATmega32u4), 4 KB used by bootloader
SRAM: 2.5KB (ATmega32u4)
EEPROM: 1KB (ATmega32u4)
Other related steps
Digital IO ports: 23 (D0-D13, D14-MISO, D15-SCK, D16-MOSI, D18-23 [A0-A5])
Analog inputs: 12 (A0~A5, D4~A6, D6~A7, D8~A8, D9~A9, D10~A10, D12~A11) Serial communication: D0 (RX) and D1 (TX)
IIC communication: D2 (SDA) and D3 (SCL)
External interrupts: D3 (interrupt 0), D2 (interrupt 1), D0 (interrupt 2), D1 (interrupt 3), D7 (interrupt 4)
PWM ports: D3, D5, D6, D9, D10, D11, D13
SPI: ICSP pin. Supports SPI communication using SPI library. It is important to note that SPI pins do not connect to any number of I/O pins like UNO. They are ICSP ports
It can only be moved by boot. This won't work if your expansion board doesn't have an ICSP pin connected to 6 feet.
LED: 13. Digital pin 13 has a built-in LED. When the pin is high level, the LED is bright; when the pin is low level, the LED is not bright.
packing list
1 x keyestudio Leonardo R3 development board
1 x USB cable
<div><br class="Apple-interchange-newline">Driver installation installs Arduino and installs the driver. The Arduino file connects to the Arduino program body and your computer driver with an acceptable Arduino USB cable. Different systems have similar driver installations. Start driving with the following Win7 system. Insert one end of the USB cable into the keyestudio Leonardo and plug it into your computer's USB outlet. When you connect the development board to your computer for the first time, right key single-click "Computer" - "Attributes" -> single-click "Equipment manager", then look at "Other equipment", "Arduino Leonardo" will appear. Masu. Then right-click on the Arduino Leonardo and select the top menu option (Update Software…) and select "Automatically new driver software" or "Browse my computer for driver software." On this page , ``Look at my computer and look for driver software.'' Then browse and select the option for the ``Drivers'' folder. Confirm the message when the software is installed. When the installation is complete, click "Close". A driver is installed here. After that, you can right-click "Computer" - "Attributes" - "Device Manager" and see "Arduino Leonardo (COM3)". </div>